
If you own a vintage synth, you are probably aware of the maintenance issue with knobs or faders on the front panel. They can get filled with dust, grime, hair, and food over years of exposure. This can cause 'scratchy' volume controls, unstable oscillators, erratic LFOs, and make your synth unresponsive.
In my article on Arp Odyssey Rebuilding, I briefly described several methods of potentiometer cleaning. In this article, I go into more detail, and determine which method works the best.
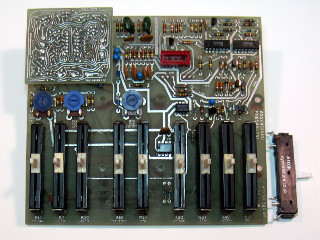
Arp Omni Faders

Arp Omni Faders
While repairing the synth section of an Arp Omni, it occured to me that the circuit board with the faders would make a good case study for cleaning pots. The faders were all similar in construction, had the same exposure to dirt and grime, and it was apparent that they had never been cleaned before.
The single fader laying on its side is a new replacement unit. More on that later.
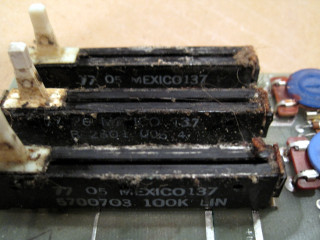
Arp Omni Dirty Faders

Arp Omni Dirty Faders
I had already done a surface wipe-down when I took that photo. In reality, the faders looked like this.
If this is an article about cleaning pots, why am I talking about faders?
A potentiometer is a variable resistor with a centre tap. The centre tap is connected to a wiper. If the mechanical travel of the wiper is rotary (with a knob) it is usually called a pot, for short. If the mechanical travel is linear it is usally called a fader.
Other than the mechanics, both styles of potentiometers are electrically the same, and they have the same cleaning issues.
I happened to come across a group of faders that were similar, so that is what I used for my test.
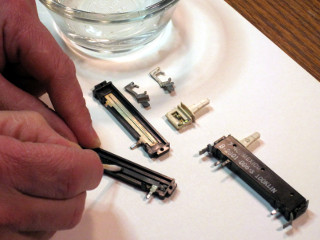
Internal Cleaning

Internal Cleaning
In general, there are 3 ways of cleaning potentiometers. Using compressed air, spraying with contact cleaner (or isopropyl alcohol), or complete disassembly with manual cleaning.
After spraying with contact cleaner, it's best to exercise the potentiometer a few times, to loosen up the dirt.
The question is, what method, or combination of methods, works the best?
I selected 5 ways of cleaning pots that I've used in the past, plus I left one of the faders as-is with no cleaning.
In addition to these cases, I also considered a brand new fader. Since it's not possible to buy exact Arp replacements anymore, I used a fader manufactured by Synthrestore. You can see it in the first photo. They are meant to be mechanically and electrically equivalent to the older style Arp faders.
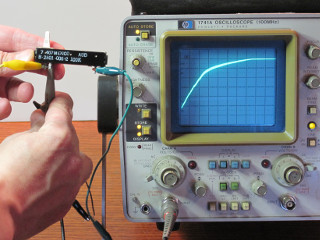
Oscilloscope Test Setup

Oscilloscope Test Setup
To determine how clean a fader was, I connected a DC power supply across the outer terminals, and probed the centre terminal with an analog storage oscilloscope.
By moving the wiper across its entire range, a trace appeared on the scope. If the trace was smooth, it indicated a clean fader. If there were discontinuities, it indicated that there was dirt in the fader, and it was effecting the electrical contact of the wiper.
I desoldered all of the faders from the board before performing the tests. During an actual repair job, I would only remove faders that I was going to disassemble or replace, as the desoldering procedure can be labour intensive and problematic.
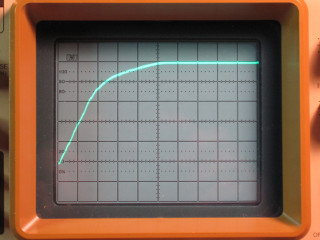
New Fader

New Fader
This trace is smooth and clean. This is what you would expect from a new potentiometer.
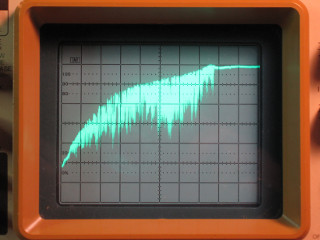
Fader #1 As-is For Comparison

Fader #1 As-is For Comparison
This trace is a mess. The spikey irregularities show that this fader is full of dirt.
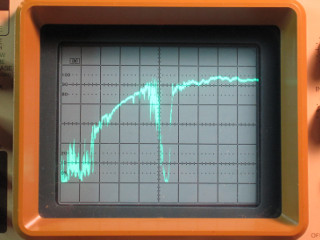
Fader #2 Compressed Air Only

Fader #2 Compressed Air Only
While the air cleaning did a reasonable job of removing loose debris, there is still a big dropout in the middle.
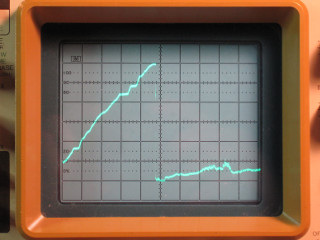
Fader #3 Contact Cleaner Only

Fader #3 Contact Cleaner Only
Contact cleaner by itself seems to work OK, but there are still build-ups of dirt, especially near the end of the travel, and the wiper loses all contact inside of the potentiometer. It was hard to move the wiper in a smooth, continuous motion, and this caused some flat spots in the trace.
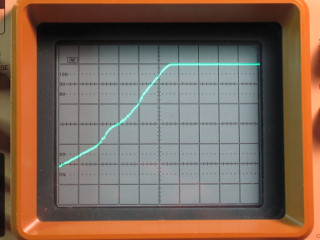
Fader #4 Contact Cleaner Followed By Air

Fader #4 Contact Cleaner Followed By Air
Contact cleaner followed by compressed air worked very well. Other than a few blips in the trace, this is completely acceptable.
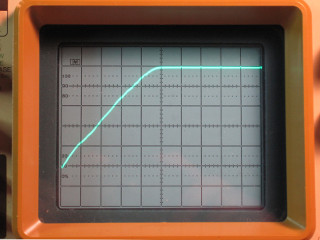
Fader #5 Disassembly And Manual Clenaing

Fader #5 Disassembly And Manual Clenaing
This trace is virtualy indistinguishable from a new fader.
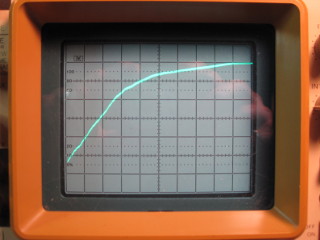
Fader #6 Soak In Isopropyl Alcohol

Fader #6 Soak In Isopropyl Alcohol
This trace is similar to cleaning with contact cleaner, followed by compressed air. However, the fader had to be de-soldered from the board.
Cleaning with compressed air alone does a very poor job. However, it seems like a good idea for routine preventative maintenance, and won't cause any harm to your equipment in the long run.
Cleaning with contact cleaner alone is not very effective, as dirt seems to just move around, and isn't removed.
My recommended cleaning method is spraying with contact cleaner, followed by compressed air. I believe it's effective because the compressed air stage forces out the contact cleaner, and the dirt that's dissolved in it. This is the most time-effective method, as you probably don't have to do too much disassembly to get to the pots.
If contact cleaner and air don't do the trick, the next best method is to disassemble and clean the pot. However, this is almost always very labour intensive, or impossible. There is also the option of soaking it in isopropyl alcohol, but you still have to remove it from the board.
If it's very easy to replace the pot with a new one, this is obviously the best method. However, it's usually NOT easy, and an exact replacement may be difficult or impossible to find.
Potentiometer Cleaning Showdown
Potentiometer Cleaning Showdown